
myTracks for iOS is primarily a GPS logger. The purpose is the recording and management of GPS tracks. The recorded GPS tracks are managed in a library and can be synchronized between your iOS devices and your Macs via iCloud.
In addition, during a recording, photos can be taken which are then stored together with the GPS track. With iCloud support enabled, the photos are synchronized between all devices.
A GPS recording is usually started and stopped explicitly. By means of the short time recording function, you can specify how long the GPS recording should run. In addition, there is the diary mode. If this is active, then myTracks records one track per day. However, this contains only a rough history of the places you visited. To save battery power, the GPS chip is rarely used in this mode. The diary mode can always be activated without burdening the battery. While the diary mode is active further regular recordings can be started.
myTracks allows you to navigate along previously recorded GPS tracks or imported routes. myTracks is not a complete navigation solution as it does not calculate routes but only allows navigation along existing tracks or routes.
myTracks also brings an app for Apple Watch. With this app, you can remotely control the recording on the iPhone, but also record directly with Apple Watch.
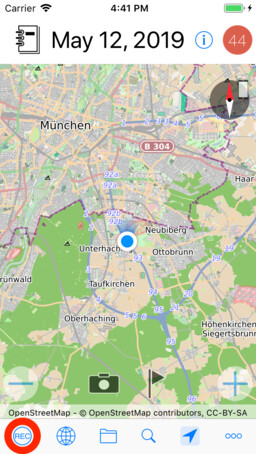
The most important feature of myTracks is the recording of GPS tracks. To start a recording tap the button with the text Rec in the lower left corner. Then select Start Recording to start recording.

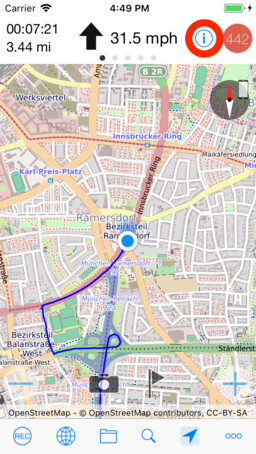
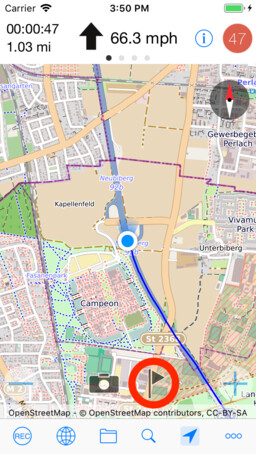
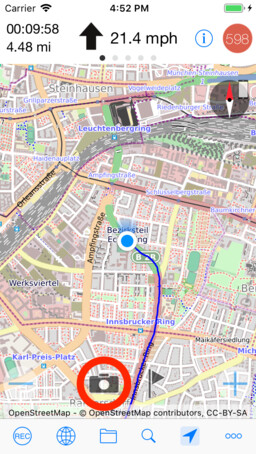
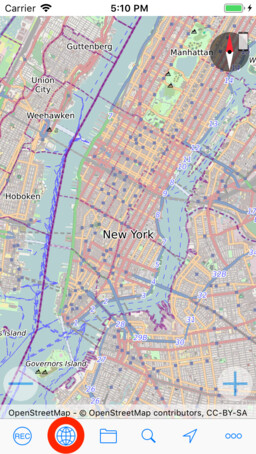
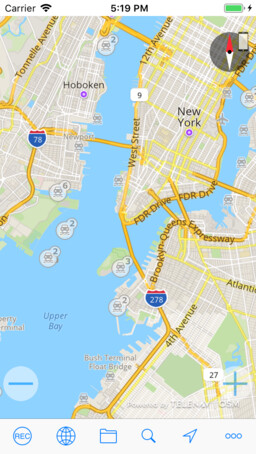
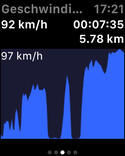
Above the map, the current duration, length, speed and direction of movement are displayed. The number of recorded track points is displayed in the red circle. Activate the button with the compass needle in the lower bar to always automatically center the map to the current position.
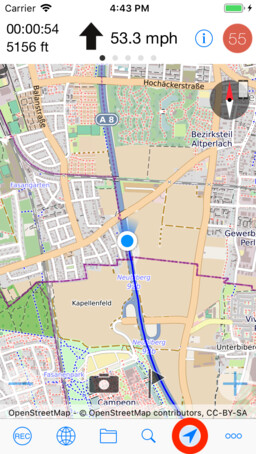
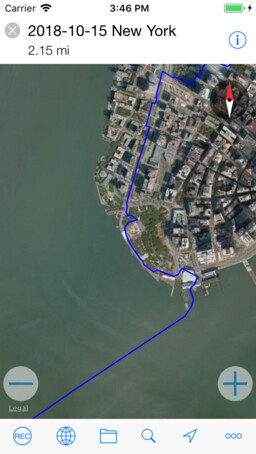
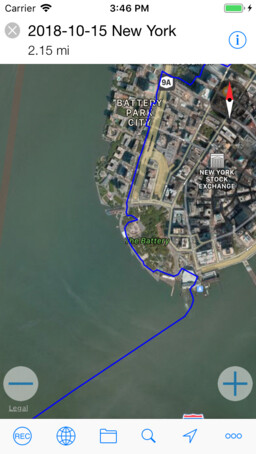
The current recording is displayed as a path on the map, the current position as a blue dot or pin. During a recording, you can move the map, zoom in and out. If the map should always be centered to the current position, activate the button with the compass needle at the bottom. By default, the map is oriented North Up. But you can activate the compass in the settings. A compass will appear on the map. When you tap the compass, a small iPhone icon appears as overlay. Now the map automatically aligns to the direction of movement.
To stop recording, tap the Rec button and select Stop Recording. The new track is then automatically stored in the track library.
Track recording does not require an active internet connection even if no map is shown.
Track recording will continue in the background. If you start a recording and then turn off the iPhone or switch to another app, recording will continue anyway. But if you quit myTracks manually (using iOS app switcher), then the track recording will stop immediately.
You can change settings for GPS recordings. Tap Rec and then Settings:
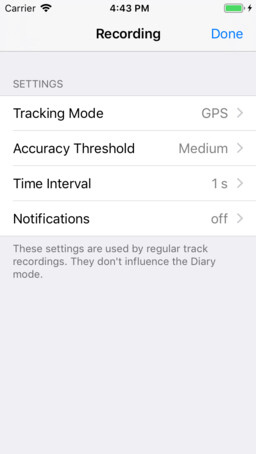
All these settings influence the regular recording only. They have no effect on the diary mode, nor on the recording with the Apple Watch.
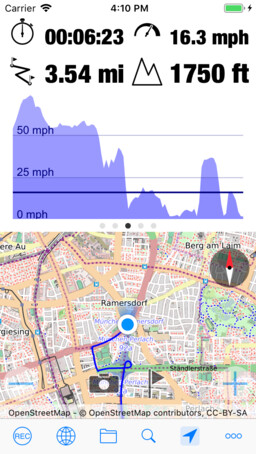
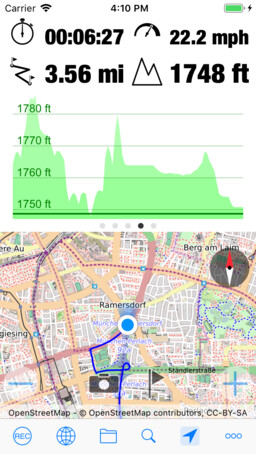
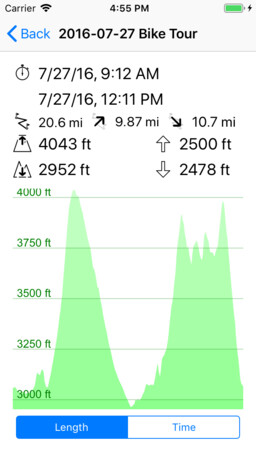
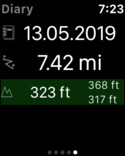
The bar above the map displays some values of the current recording. You can swipe left for more information. The second bar shows the most values: duration, length, speed, height, minimum height, maximum height, ascent and descent.
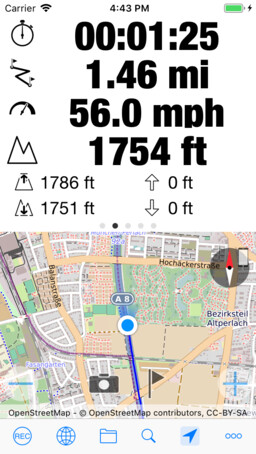
If you swipe further, the speed profile and the height profile appear.
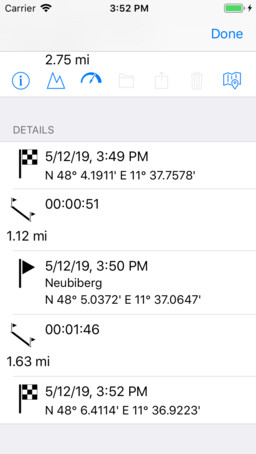
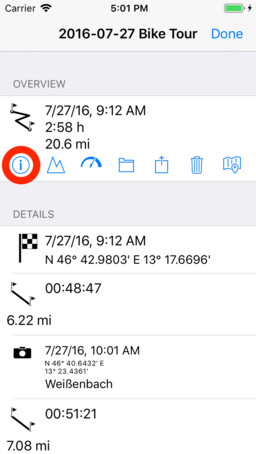
On the first bar you can find a button with an (i) symbol. If you tap it, a view will pop up showing each part of the GPS recording.
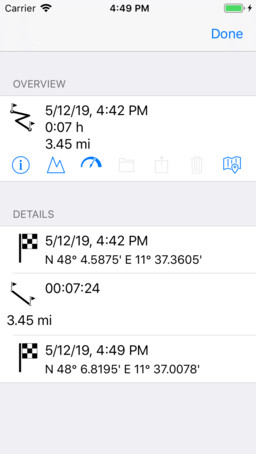
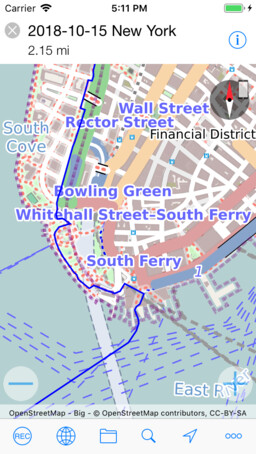
The values start time, duration and length are displayed in an overview. In the Details area, the individual sections between the first and the last point of the recording are listed. A section ends whenever a waypoint has been set or a photo has been taken. When you tap a point in this view, the corresponding position on the map is displayed with a red pin. If you tap on a section, it will be displayed on the map as a green section.
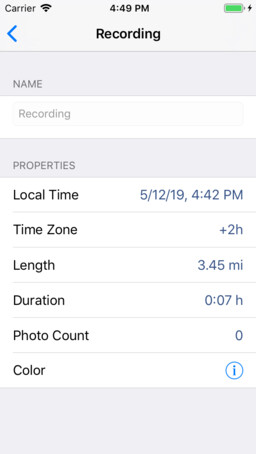
In the area Overview you will find a button with an (i) symbol. When you tap it, another view opens with details about the recording.
During a recording you can add waypoints. Waypoints are special track points that have a name and are displayed as a pin on the map.
To create a new waypoint, tap on the flag icon:
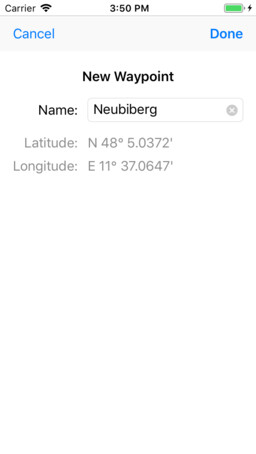
The last recorded track point is used as the waypoint. In the dialog new waypoint you can set the name of the waypoint. myTracks automatically tries to find a name for the location. However, this requires an internet connection. You can change the suggested name as you like.
In the section overview, the waypoints are displayed as well.
During a recording, you can take photos, which are automatically assigned to the GPS track. You start a photo shoot by tapping the camera icon.
These photos are stored inside myTracks data along with the track. If you delete a track, its photos will also be deleted.
In the settings, you can specify whether a copy of the photo should be stored in the iOS photo library additionally.
The position of a photo is displayed on the map with a small camera icon.
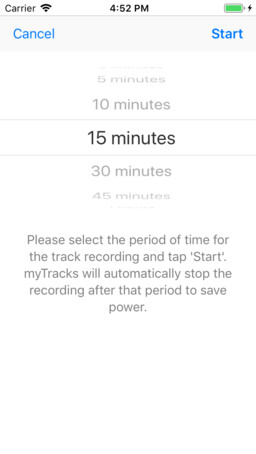
You must explicitly stop a regularly started recording. But myTracks provides a function to perform a timed recording. This feature is called Short Time Recording. You start such a recording via Rec and then Start Short Term Recording. In the following dialog, you can specify how long the recording should last. After the time has elapsed, the recording is automatically stopped.
In addition to the regular GPS recording, there is the Diary Mode in myTracks. When this mode is activated, myTracks automatically creates an individual track for each day. In order to save battery power, the GPS chip is not used in this mode, but the position is determined by mobile phone and WiFi networks. myTracks uses an iOS feature named Significant Location Changes. Whenever iOS detects that the device has moved significantly, myTracks will be notified and adds a new track point.
While the diary mode is activated, you can start a regular recording at the same time. The diary mode has its own info bar above the map. The bar shows the date of the current diary record and the number of track points. There you will find the (i) symbol as well. It will open the overview of the individual track sections (as with the regular recording).
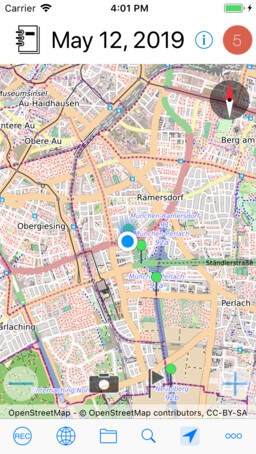
You can also add waypoints and photos to a diary recording. If the diary bar is visible, the waypoints or the photos are added to the diary track. Otherwise, the waypoints or the photos are added to the regular recording.
Within the track library, the diary tracks are stored in their own folder. You can configure the name of the folder in the settings.
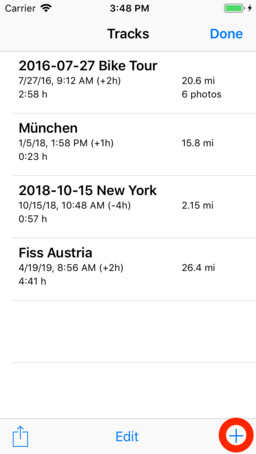
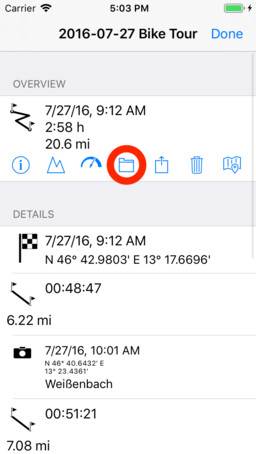
The tracks recorded by myTracks are managed within the track library. The library consists of the tracks and arbitrarily nested folders. You open the library by tapping the symbol with the Folder.
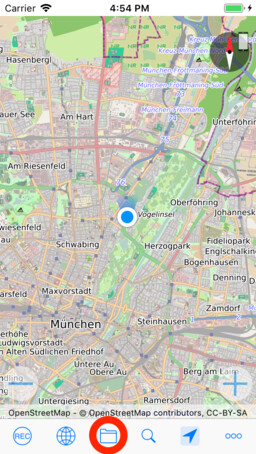
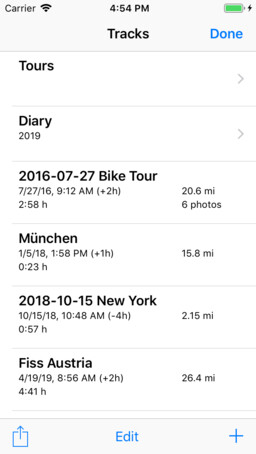
Now the tracks and folders are listed. If you tap on a track, it will be displayed on the map. When you tap a folder, its content is displayed.
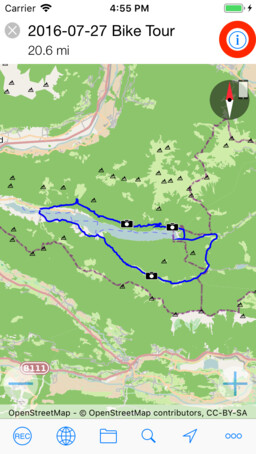
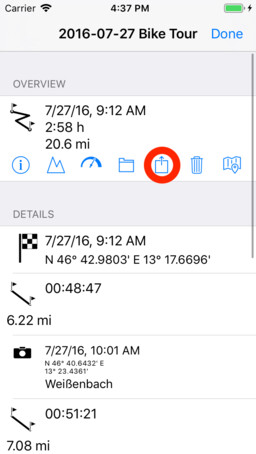
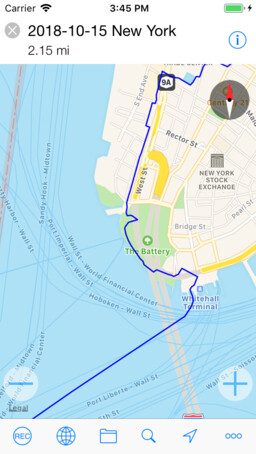
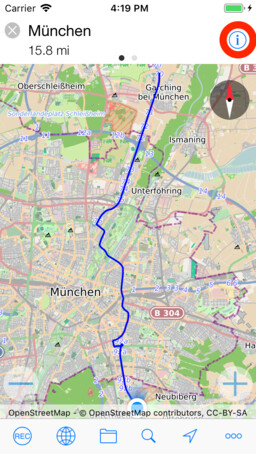
If you tap a track in the track library, it will be displayed on the map. In addition, above of the map you will find a bar with the name and the length of the track. In this bar you will also find the (i) symbol. If you tap it, the view with the individual track sections will show up.
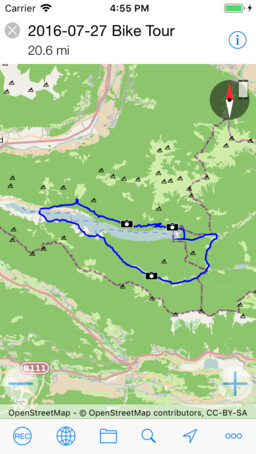
In the bar you will find a small x in the upper left corner. Tap it to close the track, i.e. it is no longer displayed on the map. If you open another track from the track library, a previously opened track will also be closed.
If you have opened a track, you can open the speed or elevation profiles. First tap the (i) icon in the top bar, and then tap the mountain or the speedometer button.

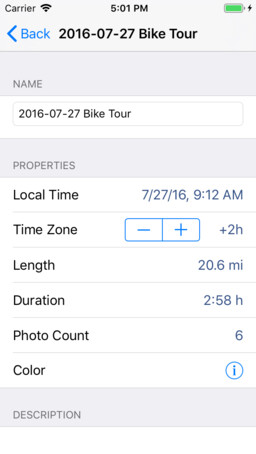
The individual track points of a track can not be edited with myTracks for iOS. You can do this with myTracks for macOS, for example. But you can change some properties, such as the name or the color. First open the track. Then tap the (i) button in the top bar. The view with the track sections appears. In the overview you will find an (i) icon. Tap the icon to open the track properties view. There you can change the name, description, keywords and color.
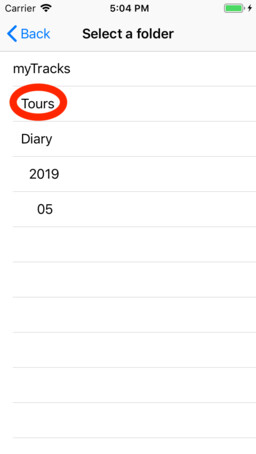
The track section view also contains a button (folder icon) to move the track to another folder. If you tap on it, you can move the track to any existing folder.
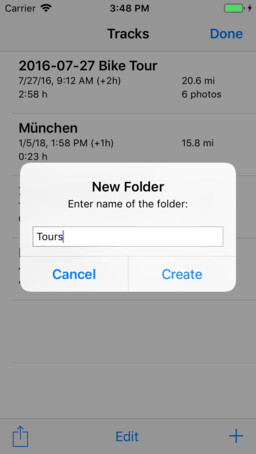
You can also create a new folder in the track library. To do this, open the track library or any other folder. Then tap the + icon to create a new folder.
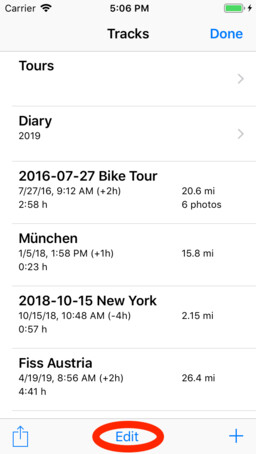
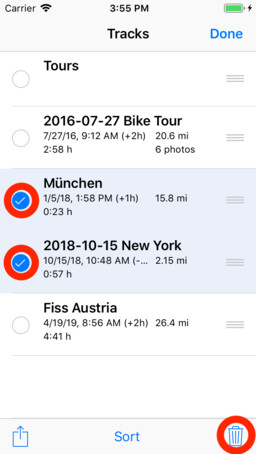
The list of GPS tracks can be sorted according to different criteria. First open the track list or any folder. Then tap Edit and Sort. Then you can specify the criterion according to which the tracks are to be sorted. You can also sort the tracks manually. To do this, you must first activate the edit mode again. On the right side of each track appears a handle. If you hold it, you can move the track manually.


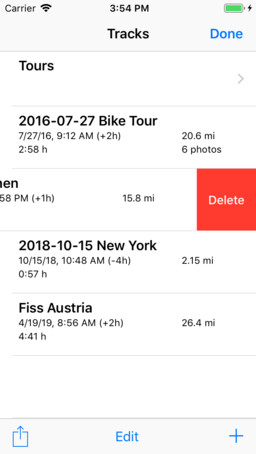
To delete a track, you can simply swipe from right to left across the track. Then a Delete button appears on the right. Tap the button to delete the track.
You can also delete multiple tracks at once. To do this, first enable the Edit mode by tapping Edit. Now select as many tracks as you want by tapping the tracks. Then tap the trash button to delete the tracks.
The GPS tracks can be exported as GPX or KML files to be used with other apps on the iPhone. Thus, you can send tracks by e-mail or drop in Dropbox.
There are different approaches to export one or more tracks. If you have opened a track and want to export it, first tap the (i) in the top bar and then the export icon.
An export for one or more tracks can also be performed out of the track list. To do this, activate the edit mode by tapping Edit. Then select one or more tracks and tap on the export icon to export.
You can also export all tracks of a folder. To do this, open the corresponding folder in the track list and then tap the export icon.
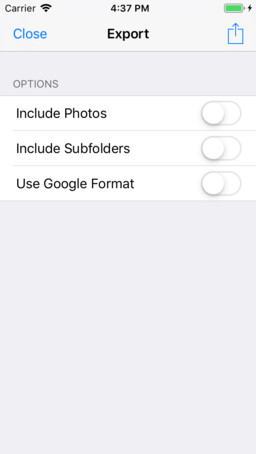
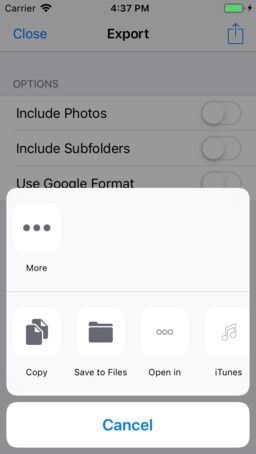
After tapping the export symbol a new dialog will appear where you can configure the export:
myTracks will export each track as a single GPX or KML file. In case you export more than one track myTracks will create a ZIP file containing all the tracks as individual files.
Both GPX and KML files cannot contain photos. Therefore photos have to placed next to these files. In case the Include Photos option is activated myTracks will always create a ZIP file and adds the photos next to the GPX files. In case Use Google Format is activated myTracks will create a KMZ instead of a KML file. From a technical point of view a KMZ file is a ZIP file that contains a KML and additional files.
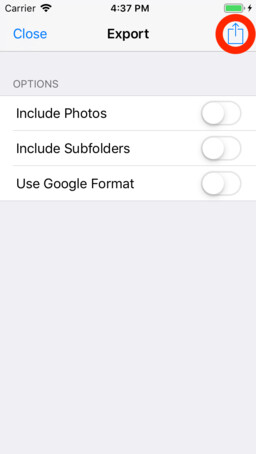
After configuring the export you finally have to perform the export by tapping the export symbol again. Afterwards the iOS dialog for sharing files will appear. Now you have the following options:
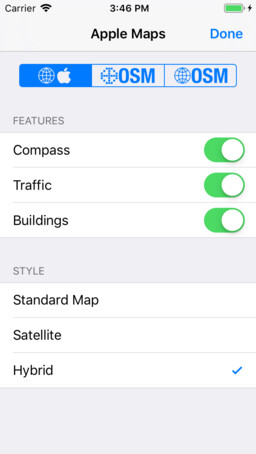
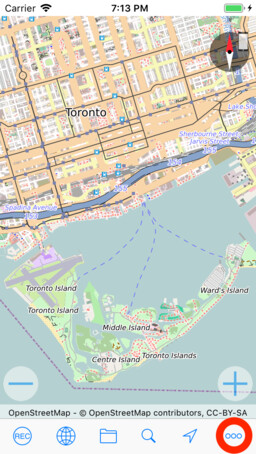
myTracks currently supports three different map types:
To switch between different map types, tap the globe icon. There you will also find the settings for the individual map types.
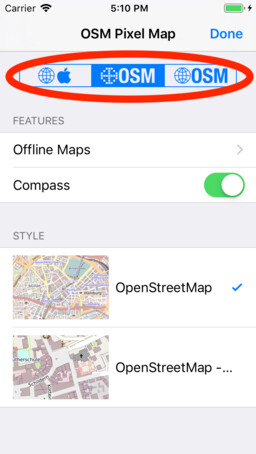
In the following, the different map types are presented in detail.
This type of map is the Apple Map as you know it from the Maps app. With the typical zoom gesture, you can zoom in or out of the map. If you have zoomed far into the map, you can tilt the map by swiping up and down with two fingers at the same time.
In the settings you can choose between the styles Standard, Satellite and Hybrid. In addition, you can activate the display of buildings. This setting only affects the Standard style. It makes buildings appear as 3D objects when you tilt the map. However, these 3D buildings are only available for selected cities.
By default, the map is always displayed North Up. In the settings you can activate the compass. If this is activated, then the map can also be rotated arbitrarily. To re-north the map, tap the compass again.
In the settings, you can also activate the display of the current traffic situation.
The data for the Apple Map is always downloaded from the Internet as needed. The Apple Map does not provide a way to load offline maps.
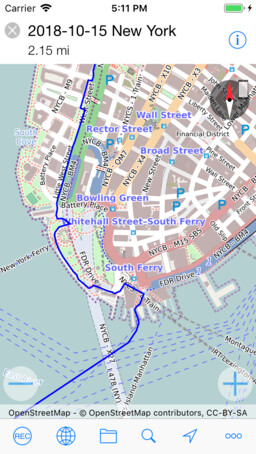
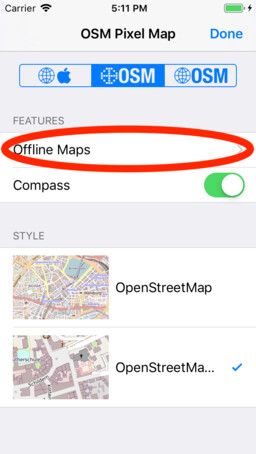
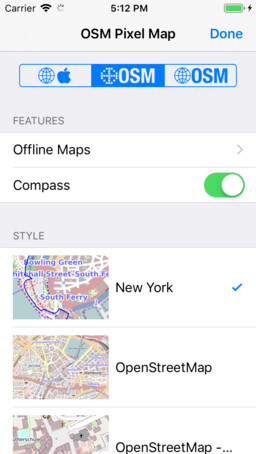
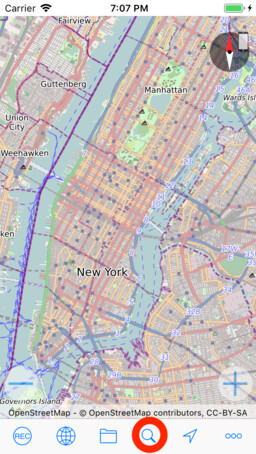
The OSM Pixel Map is a map that shows a lot of details. Technically, this map type works differently than the other map types. The maps themselves are calculated on a server as PNG pixel images and transferred as such to the iOS device. As a result, new pixel images must be loaded from the server when changing the zoom level.
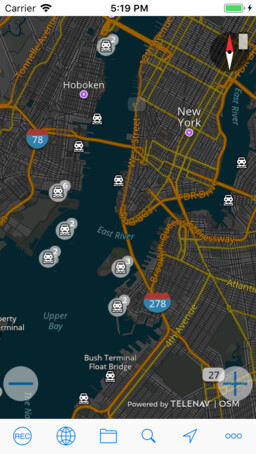
The zooming and the rotation works in the same way as for the Apple Map. However, tilting the map is not possible here. In the settings you can switch between the styles OpenStreetMap and OpenStreetMap - Big. In the latter, all texts and symbols are shown much larger.
A major advantage of the OSM Pixel Map is the ability to load offline maps for any region, which you can then use without an Internet connection.
To load offline maps for the OSM Pixel Map, you must first tap the globe to open the settings. Then tap the entry Offline Maps.
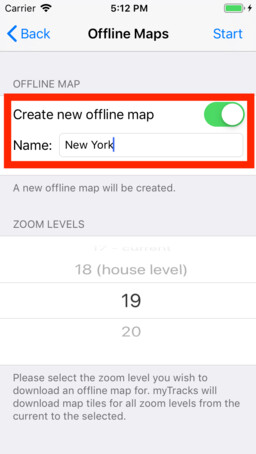
Now there are two ways to load offline data:
In both cases, you must set the maximum zoom level for which offline data is to be loaded. The map data for the area currently visible in myTracks is always loaded. If you want to load the offline data for Hamburg for example, then you must first align the map section on Hamburg. Then you have to start the loading of the offline data in the settings.
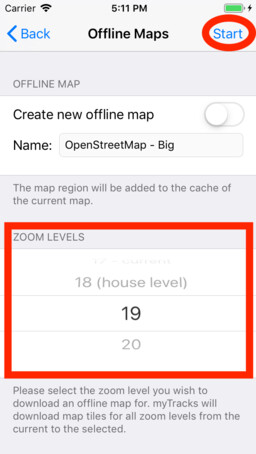
When you create a new, named offline map, it then appears in the list of available map styles.
To delete an offline map, swipe the list from right to left in this list. You can not delete the fixed maps OpenStreetMap and OpenStreetMap - Big. However, if you swipe over this entry from right to left, you can clear the map cache, i.e. all previously loaded map data will be deleted.
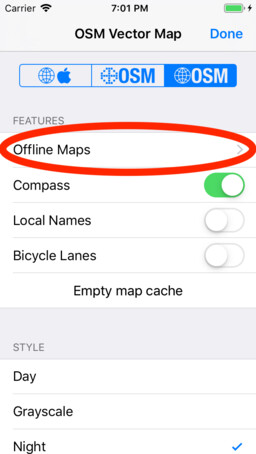
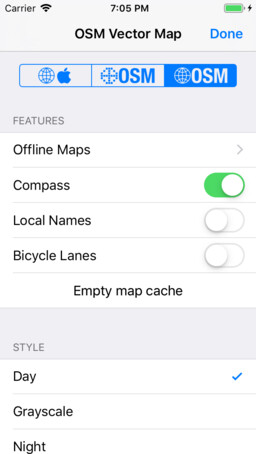
myTracks also offers a vector-based version of the OSM map. This offers the following advantages in contrast to the pixel-based map:
Unlike pixel-based maps, however, this map does not contain as many details.
If you are working with this map type for the first time, myTracks will load the required map data directly from the server. Thus, first of all an internet connection is needed. However, the use of offline maps is more practical, because then the data of a complete country is always available. This has the advantage that you can always work without an Internet connection.
The offline maps of the OSM vector map are always country related i. e., each country has a complete map that contains all zoom levels. The list of all available offline maps can be found in the settings of the OSM vector map. Tap the entry Offline maps. The list is sorted alphabetically by country name. In the case of the US, a list of all federal states will appear again, as they are available as offline maps individually. In addition there are some map packages available, e.g. for Europe.
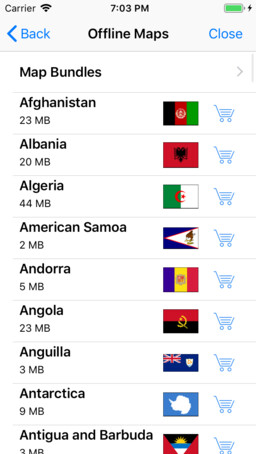
By tapping the download icon, an offline map can be downloaded from the server to the iPhone. Each offline map requires an in-app purchase. A once-purchased offline map can be loaded as often as you like on all your devices. The prerequisite is that all devices use the same Apple ID. The map packages bundle several countries in a single in-app purchase.
Once you have confirmed the purchase, the actual loading of the offline map begins. A progress bar indicates how much has already been loaded. Please leave myTracks open until the download is finished. Otherwise, the download can not be completed correctly.
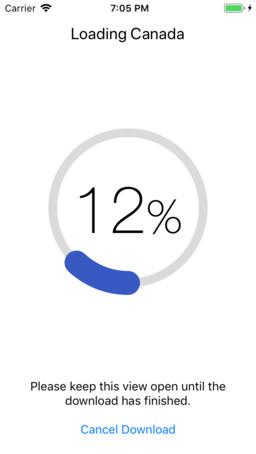
If a download is unsuccessful, you can start the download again. In any case, you never have to pay twice for an offline map.
If the offline map has been loaded, then it is available directly. You do not need to activate it explicitely. If you have loaded several offline maps, all these maps will be used by myTracks at the same time.
Installed offline maps can be identified by the fact that no download symbol is displayed next to the flag. You can also delete installed maps. In the list of all offline maps, swipe from right to left over the entry. Then a button appears with the text Delete. You can download the map for free at a later time.
In the settings of the OSM vector map the following things can be configured:
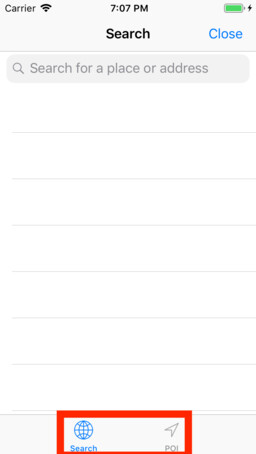
myTracks offers a search to find addresses and POIs (point-of-interest). In the bottom bar, tap the button with the magnifying glass. Now the search dialog appears. At the bottom you can choose to search for addresses (Search) or points-of-interest (POI).
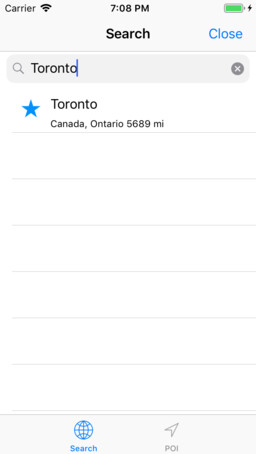
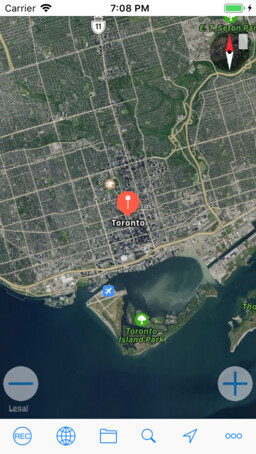
Enter an address or a search term in the search line. Then myTracks will display the results. If you tap on a result, the corresponding item is displayed on the map.
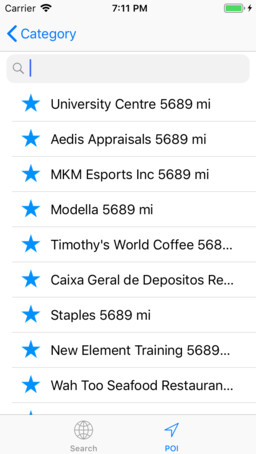
If you are searching a POI, then you can select whether the search should use the current position of the iPhone as the center of the search (current position), or the position that results from the middle of the map (map).

You can then choose a category to search for. Alternatively, you can search for all categories. You can then enter the search text in the text field. The result list is filtered accordingly.
If you tap on an entry, it will be displayed on the map.
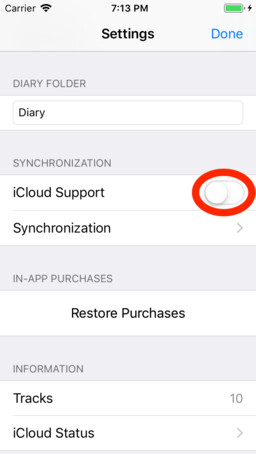
myTracks can sync tracks from the track library in iCloud. You can enable iCloud support in the settings of myTracks. Then all local GPS tracks are automatically copied to iCloud. These are then available in myTracks on your other devices.
Any tracks you record from now on are automatically copied to iCloud at the end of the recording, making them available directly on the other devices.
If you have a Mac and also work with myTracks there, the tracks will also be synced via the iCloud there, if iCloud synchronization is enabled.
If iCloud Sync is on and you delete a track, the track will be deleted on all devices. Since there is no backup function for iCloud Drive data, a track is permanently deleted in this case. If you rename, edit, or move a track, that information also syncs between devices.
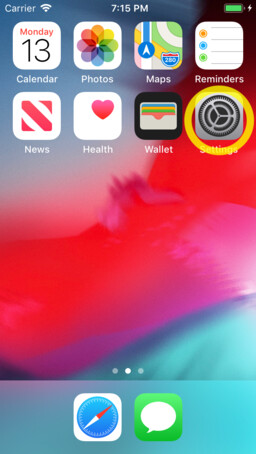

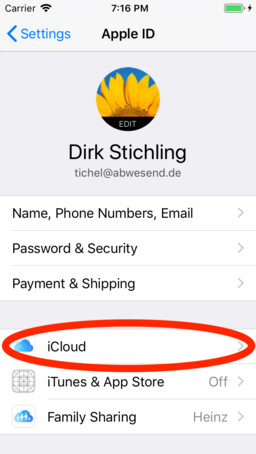
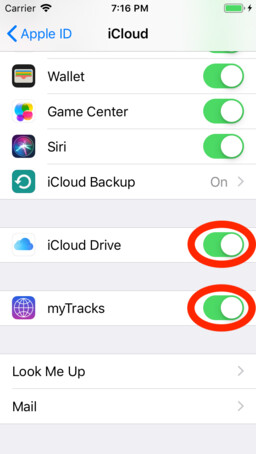
Technically, myTracks uses the iCloud Drive feature for iCloud support. This also means that you need to have this feature enabled in iOS settings. Otherwise, activation of iCloud fails in myTracks. However, the tracks do not appear as individual files in the iCloud Drive app on the iPhone or in the iCloud Drive folders on the Mac. This has been deliberately realized because myTracks itself manages these files. If you need the files in other apps then you can use the export function of myTracks.
myTracks can import GPS tracks as GPX files. If you use an app on your iPhone that can export a GPX file (which can also be Mail or Dropbox) then use the Open in feature there. In the following dialog, select myTracks. Then myTracks opens and the GPX file is imported. The imported track or tracks are not automatically opened but added to the track library. Open the track library to open one of the imported tracks.
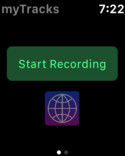
If you have an Apple Watch, you can also install myTracks on the Apple Watch. After starting, you will find a button to start a new recording. Before you start, you must choose whether to record on the iPhone or on the Apple Watch.

If you record on the Apple Watch, then the GPS chip of the Apple Watch is used for recording. During the recording, no pairing with the iPhone is necessary. You can move around without the iPhone with the Apple Watch. When the recording on the Apple Watch has finished, the recorded track is then synchronized with myTracks on the iPhone. The next time you start myTracks on the iPhone, the GPS track will appear in the track library on the iPhone after a short while. When iCloud Sync is active, the track syncs to iCloud. The Apple Watch can not synchronize the GPS track directly with iCloud.
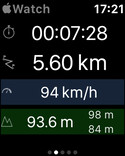
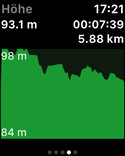
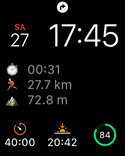
When a recording is active, a new page will appear on the Apple Watch showing the most important data of the current recording. If you record directly with the Apple Watch, then there are two more pages. These show the speed and height profile.
If the diary mode is active on the iPhone, then a separate page is also displayed for this.
On the Apple Watch there are also complications for myTracks. Depending on the selected area for the complication, different information is displayed. If a major complication for myTracks is chosen, then both the time and the length of the current recording will be displayed. The values displayed there always refer to the recording that runs directly on the Apple Watch. An iPhone recording can not be shown there for technical reasons.
To stop recording, you must force touch the watch. Then a menu will appear to end the recording. In this menu you can also add a waypoint to the current recording.

As described above, you can import GPS tracks or routes as GPX files into myTracks. There are a variety of online services that offer routes as GPX files. If you have imported such a track, then you can easily view the track in myTracks on the map. You can let myTracks navigate along such a route. However, myTracks is not a complete navigation solution because myTracks does not automatically calculate routes.
To start navigation, first open the corresponding GPS track or route. Then tap (i) to open the information window. There you will find the button to start navigation.

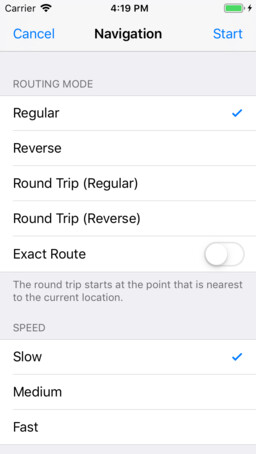
The following route modes are available:
If you activate the Exact Route option, you can not use shortcuts. If the option is not activated and you leave the route once and then return to another part of the route, navigation will simply continue there.
The Speed setting helps myTracks display hints for turning. The setting Slow should be used for walking or cycling. Medium and Fast are useful, for example, for car rides.
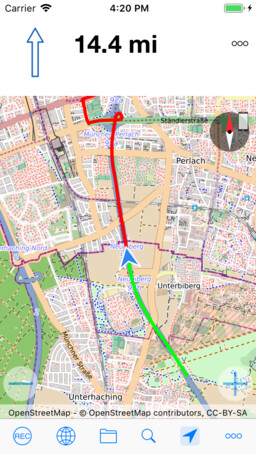
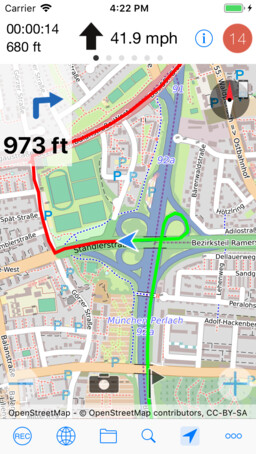
During navigation, another bar appears in the upper area. If you have to go straight ahead then you will see an unfilled straight arrow. The value is the distance to the destination:
If you need to turn soon, a filled-in arrow will appear, pointing in the appropriate direction you need to turn. The upper value indicates the distance to the point where you need to turn. The lower value indicates the distance to the destination:
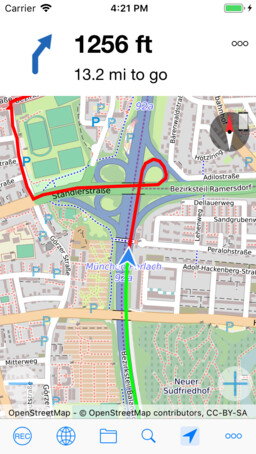
The part of the route that you have already completed is shown in green. The part that is still in front of you is shown in red.
When you tap the button with the three dots, a menu appears with the following options:
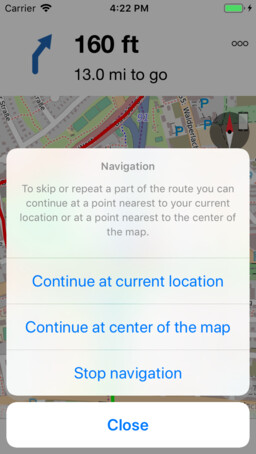
If you do not see the navigation bar at the top, the navigation information will be displayed in a rectangle in the top left corner of the map:
Note: The navigation instructions are currently only shown on the display. In particular, there are currently no voice prompts, for example.
In addition to the settings already mentioned, the following features can be configured. At the bottom right, tap the three-dot button to open the settings.
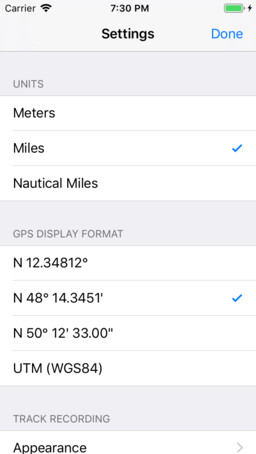
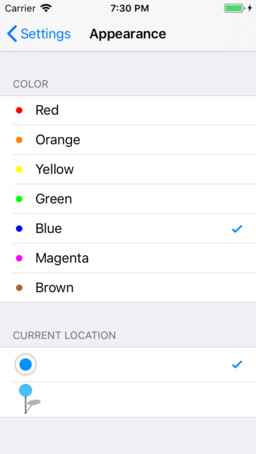
If you open the iOS app Settings then myTracks will be listed there too. The following settings can be made:
The tracks and the photos are stored in the internal document area of myTracks. As a result, this data is also saved as part of a backup. For example, if you back up using iTunes, the tracks and photos will also be backed up. Restoring such a backup restores the tracks and photos.
It behaves a little differently when iCloud Sync is active. Then the data is no longer in the internal document area, but in the iCloud area. The tracks are thus no longer secured as part of an iPhone backup.
There is another way to save tracks and photos against data loss. You can export the data. Open the track list and then tap the Export button. Now activate the option Including subfolders and, if necessary, Including photos. Now tap the Export button again. myTracks now prepares the export file. Depending on how many tracks and photos need to be exported, this step may take a little longer, so it may take a few minutes. Keep myTracks open until the following dialog appears. You can then save the created file in Dropbox, for example, or in the iTunes file share. myTracks exports the data as a ZIP file. There is no function in myTracks to restore the tracks directly from the ZIP file, but in case of data loss, the ZIP file can be extracted in other ways and the contained tracks can be imported back into myTracks.